Hello, friend! I am so glad you're here. If you’re staring at a blank wood mantel, feeling a little bit… stuck? I see you. I’ve been you. When we first moved into our home, the fireplace was this big, beautiful feature that I had no idea what to do with. It felt like this huge stage, and I had stage fright every time I tried to arrange something on it. It would either look too cluttered or too empty, never quite right.
But over the years, I’ve learned that styling a mantel isn’t some secret art form reserved for professional designers. It’s actually a simple, repeatable formula. It’s about creating balance, layering textures, and most importantly, telling a little story about you and your family. That gorgeous wood mantel is the heart of your room; it deserves to be dressed up in a way that feels warm, personal, and inviting.
So today, I want to walk you through my never-fail process. We’ll start with the basics, a simple 5-step guide that works for any style. Then, I’ll share four distinct looks you can create, from modern farmhouse to cozy traditional, with specific ideas for what to buy and where to place it. We’ll talk about budget-friendly tricks, seasonal swaps, and common mistakes to avoid. Think of me as your friend, holding your hand through the process. Ready? Let’s make that mantel shine.
My Never-Fail 5-Step Formula for a Beautiful Mantel
Before we dive into specific styles, let's nail down the core method. This is the framework I come back to every single time I refresh my mantel, whether it’s for a new season or just because I’m craving a change. It takes the guesswork out of the process and ensures a balanced, thoughtful result.
Step 1: Start With a Blank Slate
I know it’s tempting to just add new things to what's already there, but trust me on this one. Take every single thing off your mantel. Wipe it down. Give it a good dusting. Now, stand back and look at it. See that beautiful, solid piece of wood? That's your foundation. Starting fresh gives you the mental space to reimagine the possibilities without being influenced by what was there before. It’s a creative reset button, and it’s the most important first step.
Step 2: Choose Your Anchor
The anchor is the star of the show. It’s the largest piece that will ground your entire arrangement and serve as the main focal point. Typically, this is a large piece of art or a mirror. The key here is scale. You want your anchor to feel substantial, not dinky. A good rule of thumb is for it to be about two-thirds the width of the mantel itself.
- Placement: You can hang it on the wall, centered above the mantel. Or, for a more casual, layered feel (which I love!), you can simply lean it against the wall. This is also a fantastic renter-friendly option—no holes required!
Step 3: Add Height on the Sides
Now we create balance and visual interest by adding height. This is what prevents the dreaded “flat lineup” of objects. You want to vary the heights of your items to draw the eye up and around the display. You can go for a symmetrical look (matching items on both sides) or an asymmetrical look (different items that have a similar visual weight).
- Symmetrical: Think a pair of matching lamps, two identical large vases, or two sets of candlesticks.
- Asymmetrical: This is my personal favorite! Try a tall vase with branches on one side and a grouping of two or three candlesticks of varying heights on the other. The goal is for the overall height on both sides to feel balanced, even if the objects are different.
Step 4: Layer in the Middle Ground
This is where the personality comes in! The middle ground is for your medium-sized objects that will fill in the space between your anchor and your tall side pieces. This is how you create depth and interest. You don’t want everything sitting in a perfect row.
- What to use: Think about stacking a few beautiful hardcover books (I often find great ones at thrift stores with lovely cloth covers), leaning a smaller piece of art against your main anchor piece, or adding a pretty ceramic bowl or a small, sculptural object. The key is to layer, placing some items slightly in front of others.
Step 5: Finish with the 'Low' Layer
This is the final touch that connects everything. Add something low that runs along the front of the mantel or drapes over the edge. This small detail makes the arrangement feel complete and lived-in.
- Ideas: A beautiful, drapey garland (eucalyptus or cedar is lovely year-round), a small decorative bowl, a string of wooden beads, or a trailing plant like a pothos whose vines can hang down gracefully. This layer softens the hard edge of the mantel and makes the whole design feel more organic.
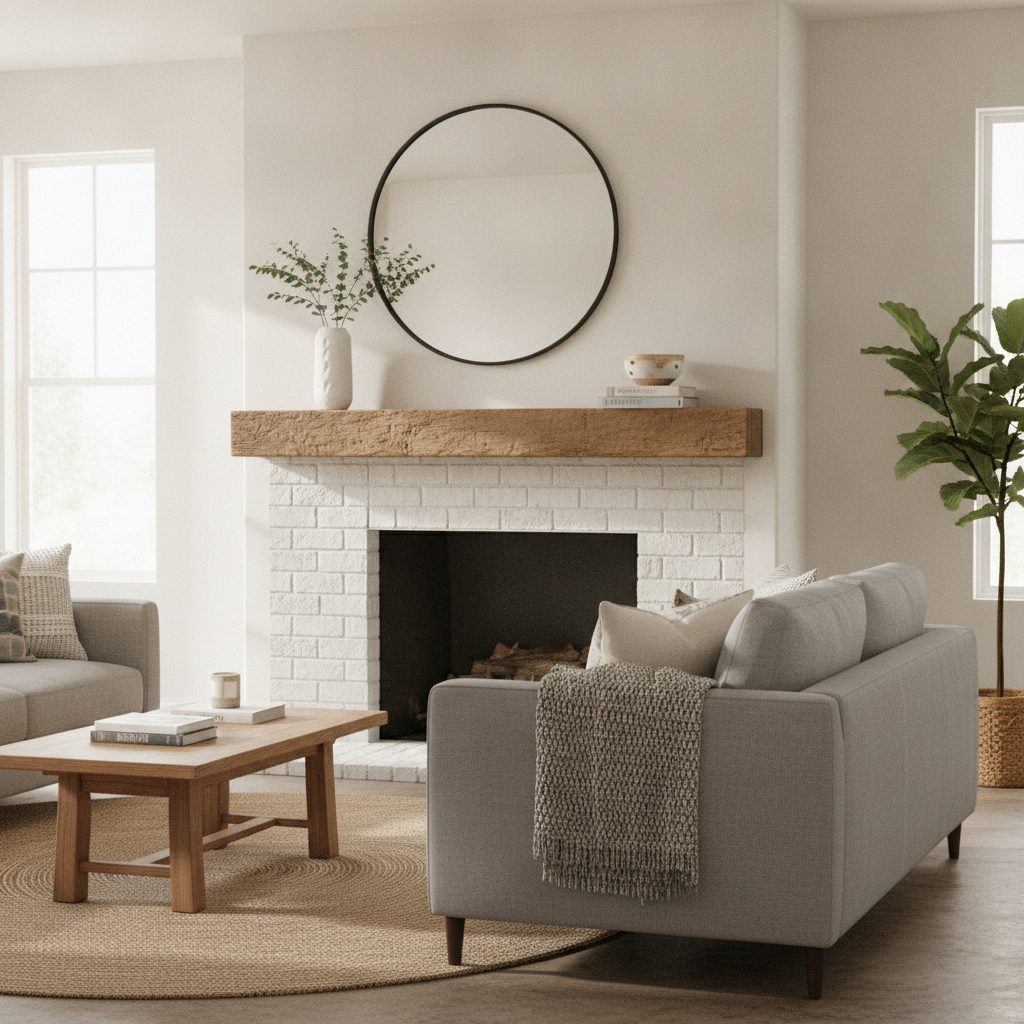
Idea 1: The Modern Farmhouse Mantel
This look is all about mixing rustic warmth with clean, modern lines. It’s cozy, uncluttered, and effortlessly chic. The key is a neutral color palette, natural textures, and a touch of matte black for contrast.
-
The Wood Mantel Itself: This style shines with a medium-to-light wood mantel, especially one that looks a bit rustic or reclaimed. If your mantel is dark wood, you can still achieve this look, but you’ll want to bring in more light-colored decor to balance it.
-
Anchor: A large, round mirror with a simple, thin black metal frame is perfect. The round shape softens the hard lines of the fireplace and mantel. A 30-36 inch diameter mirror usually works well. Lean it against the wall for that casual, collected vibe.
-
Height: Let’s go asymmetrical here. On one side—let’s say the left—place a tall, slightly distressed white ceramic vase. Fill it with some faux or dried eucalyptus stems or olive branches. You want height, so make sure the branches reach up toward the top of the mirror. On the right side, group together a set of three matte black candlesticks of staggered heights. Use simple white or cream-colored taper candles.
-
Middle Ground: Next to the tall vase, stack two or three hardcover books. To keep it neutral, you can turn them so the pages face out, or find books with simple linen covers in shades of cream, gray, or beige. On top of the books, place a small, textured ceramic pot—maybe something with a subtle pattern or a handmade feel. It could be empty or hold a tiny faux succulent.
-
Low Layer: Drape a faux seeded eucalyptus garland across the length of the mantel. Don’t pull it tight; let it swag a little in the middle. The soft green adds a touch of color and life and bridges the gap between the left and right sides of your arrangement.
-
Practical Notes:
- Budget: You don’t need to spend a fortune. Stores like Target, HomeGoods, and even Walmart have fantastic and affordable round mirrors. Vases and candlesticks are classic thrift store finds!
- Renter-Friendly: This entire look is 100% renter-friendly since nothing needs to be nailed to the wall. Leaning is your best friend!
Idea 2: The Warm & Cozy Traditional Mantel
This style feels like a warm hug. It’s layered, personal, and timeless. It leans into the history of the fireplace as the heart of the home, showcasing family photos and treasured objects. It often uses symmetry to create a sense of calm and order.
-
The Wood Mantel Itself: This look is gorgeous with a classic, dark wood mantel—like mahogany, cherry, or a dark oak. The deep wood tone adds to the richness and warmth.
-
Anchor: A beautiful landscape painting in an ornate, vintage-style gold or dark wood frame. Look for art with warm tones—golds, deep greens, and rich browns. This piece sets the cozy, classic mood. Make sure it's hung a few inches above the mantel surface.
-
Height: For a traditional look, symmetry is beautiful. Place a matching set of small buffet lamps on either end of the mantel. Look for bases in brass or a dark metal, with simple cream or white fabric shades (pleated shades are a lovely touch!). The soft light they cast in the evening is pure magic.
-
Middle Ground: This is where you bring in the personal touches. Gather a collection of framed family photos. To keep it from looking chaotic, stick to a cohesive frame palette. You could do all brass frames, all silver, or all dark wood. Mix up the sizes and orientations (some vertical, some horizontal). Layer them in front of each other, on both sides of the central artwork.
-
Low Layer: In the center, right below the painting, place a small, meaningful object. An antique brass box, a small porcelain dish passed down from your grandmother, or even a beautiful magnifying glass on a stand. It’s a small detail that adds a layer of history and story.
-
Practical Notes:
- Photos: To make mismatched photos feel more unified, try printing them all in black and white or with a consistent sepia filter.
- Thrifting: This look is made for thrifting! Hunt for vintage-style frames, old brass objects, and landscape paintings at your local secondhand shop. You’ll find pieces with much more character than anything new.
Idea 3: The Minimalist & Natural Mantel
For those who love clean lines, open space, and the beauty of natural materials, this one is for you. This is not about having an empty mantel, but about choosing a few items with intention and letting them have room to breathe. The wood of the mantel is a key decorative element itself.
-
The Wood Mantel Itself: A simple, clean-lined wood mantel is the perfect backdrop. Think light oak, maple, or a smooth, unstained pine. The grain of the wood is part of the design.
-
Anchor: Instead of a mirror, opt for a large, modern piece of abstract art. Choose something with a lot of texture and a very simple color palette—creams, beiges, charcoal, and maybe one muted accent color. Frame it in a simple, gallery-style light wood or white frame. Lean it off-center, perhaps more to the right side of the mantel.
-
Height: On the opposite (left) side, place a single, tall, sculptural vessel. A minimalist ceramic vase in a matte white, black, or earthy terracotta color is perfect. Inside, place just one or two interesting, sculptural branches—something you found on a walk with an interesting shape. No big bouquets here; the focus is on the form of the branches themselves.
-
Middle Ground: Here's the key: resist the urge to fill the space. In the center, or perhaps nestled near the base of the vase, place one single object of beauty. A beautiful, handmade pottery bowl, a unique piece of stone or crystal, or a small, sculptural metal object. That's it. The negative space around the object is just as important as the object itself.
-
Low Layer: Nothing. Let the wood mantel be the low layer. The simplicity is the statement.
-
Practical Notes:
- DIY Art: You can create your own textured abstract art! Get a large canvas and some drywall joint compound. Spread it on the canvas with a putty knife to create texture, let it dry, and then paint it a solid neutral color. It’s an incredibly affordable way to get a high-end look.
- Nature is Free: Forage for your branches! Look for fallen branches with interesting twists and turns after a windy day. They are beautiful, organic, and cost nothing.
Idea 4: The Eclectic & Collected Mantel
This style is for the collectors, the maximalists, the storytellers. It’s a vibrant, personal mix of old and new, quirky and classic. The only rule is that you have to love every piece on it. This look is built over time and tells the story of your travels, your hobbies, and your unique personality.
-
The Wood Mantel Itself: Any wood mantel can work for this style, as it’s more about the collection on top. A classic mantel provides a great neutral backdrop for your treasures.
-
Anchor: Go bold with an oversized, ornate vintage mirror. Think something with a carved wood or gilded frame. Leaning it against the wall adds to the casual, “I just found this at a flea market” feel. The more elaborate, the better!
-
Height: Asymmetry is your friend. On one end, place a quirky vintage lamp—maybe one with a colorful base or a unique shade. On the other end, create height by stacking a tall pile of your favorite art or design books. Top the book stack with a small bust (you can find great affordable ones online) or another sculptural object you love.
-
Middle Ground: This is where you have fun. Layer, layer, layer! Lean a few smaller, mismatched framed prints and postcards against the big mirror. Add a glass cloche with a favorite object inside—a bird’s nest, a vintage camera, a collection of matchbooks. Group a few small ceramic vases or vessels together. Mix metals, textures, and eras freely.
-
Low Layer: A trailing plant is a must for this look. A pothos or philodendron in a quirky, colorful pot placed on one corner of the mantel will let its vines cascade down, adding life and a beautiful organic shape to your collection.
-
Practical Notes:
- Build it Slowly: This look feels most authentic when it’s genuinely collected over time. Don’t try to buy it all in one go. Pick up things you love from travels, flea markets, and antique stores.
- The Power of a Tray: If your collection starts to feel a bit too chaotic, try grouping some of the smallest items together on a small decorative tray on the mantel. It adds a bit of structure.
Styling Your Mantel Through the Seasons
You don’t need to completely overhaul your mantel four times a year. The trick is to create a solid “base” design using the formula, and then simply swap out a few key elements to give a nod to the season.
-
For Fall: Swap out your green stems for dried branches, pampas grass, or stems of autumn leaves. Tuck a few small white or green pumpkins (real or fake) into your arrangement. Change your candles to a warmer color like amber or rust.
-
For Winter & Holidays: This is the time for garland! Drape a fresh or faux cedar or pine garland across the mantel. Weave in some battery-operated fairy lights for a magical glow. You can swap your main art piece for a beautiful wreath. And of course, add your stocking holders!
-
For Spring: Bring in the life! Replace dried branches with fresh flowering branches like forsythia or cherry blossoms. Add a vase of tulips or daffodils. Switch to lighter-colored candles and maybe swap a piece of art for a botanical print.
-
For Summer: Keep it simple and airy. Greenery is key. A few vases of fresh-cut greenery from your yard, a bowl of seashells from a recent trip, or art with a coastal or landscape theme feels just right.
Common Mantel Mistakes & Practical Tips
We all make them! Here are a few things I’ve learned to avoid.
- The Tiny Object Lineup: Avoid lining up lots of small, similarly-sized objects in a row. It can look cluttered and lacks a focal point. Always vary the height and scale of your items.
- Ignoring Scale: A common mistake is using art or a mirror that is too small for the fireplace. It will feel lost. Go bigger than you think you need for your anchor piece!
- Pushing Everything Back: Don’t be afraid to use the full depth of your mantel. Pull some items forward and layer others behind them to create depth and interest. A mantel with everything pushed flat against the wall can look one-dimensional.
Your Wood Mantel Questions, Answered
How high should I hang my mirror or art over the mantel?
A good guideline is to hang the bottom of the frame 4 to 6 inches above the mantel shelf. This creates a visual connection between the object and the mantel, so they feel like a single unit rather than two separate things.
Can I put my TV over the fireplace?
Oh, the great debate! From a design perspective, it's not ideal. A TV is a large black box that can detract from the beauty of your fireplace as a focal point. It’s also often mounted too high for comfortable neck-craning viewing. However, I live in the real world, and sometimes it's the only logical place for it! If you must, consider a “Frame TV” that displays art when not in use. Also, try to build the rest of your mantel decor around it—place taller items on either side to help it blend in, and keep the decor below it very simple and low-profile.
What if my wood mantel is a dark, dated color I don't love?
You have options! The most dramatic is to paint it. A fresh coat of white, black, or even a deep green or navy can completely transform your fireplace. If you’re up for a bigger project, you could strip and sand it down to the raw wood for a more natural, rustic look, then seal it with a matte finish. Or, you could lean into the moodiness! A dark wood mantel can be the perfect foundation for a cozy, traditional, or library-style look.
My wood mantel is very narrow. How can I decorate it?
For a narrow mantel, layering is key. You won't have much depth to work with, so focus on what you can lean against the wall. A large mirror or piece of art is your best friend here. Then, you can add a few very slim candlesticks and maybe a small, trailing plant on the edge. The focus will be on vertical height and less on deep, layered arrangements.
I hope this guide has left you feeling inspired and, most importantly, confident! Remember, there are no hard and fast rules. The goal is to create a focal point in your room that makes you happy every time you look at it. Start with the formula, pick a style that speaks to you, and don’t be afraid to play around. Move things, swap them out, and live with it for a few days. Your home should be a reflection of you, and your mantel is the perfect place to start telling that story. You’ve got this!